Adding a video camera to a Multiplex EasyStar
Once we got our EasyStar
up and running, I noticed online that a lot of people use this plane for aerial
photography. I also remembered seeing
a cool article in Make Magazine talking about how
to reuse a "disposable" video camera. (These are sold as one-time-use items which,
once you've filled them up with video, you return them to the store, and they keep
the camera and give you a dvd of your video.) These cameras can be found at
Rite-Aid, CVS, Target, and probably other drugstores too. Check out
camerahacking.com for more info on hacking these
cameras to be reusable.
Well, the price of $20-$30 can't be beat, and with a little soldering and
a little software tweaking, I was able to add a working usb port to the camera
so I could download and delete videos off of it.
And since this camera was destined for an rc plane, it needed to be small and
light. So off with the camera's plastic case, and out with the batteries. The
screen was also unnecessary since nobody was going to be watching the video while
filming. (Disassembly photos can be seen
here.) I was able to grab
plenty of power from the otherwise unused GEAR servo connection of
the plane's receiver, so no extra batteries were needed.
I've also put together a hack to let us electronically control the shutter (to
start/stop the video). People who do aerial-photography from RC planes (or at least
those whose write-ups I've found on the web) seem to use a servo to mechanically press
the shutter button. But converting an electronic signal into mechanical motion, back
into an electronic signal seems inefficient to me. Not to mention all the extra
weight from the servo and the scaffolding to hold it all in place.
So I built a PIC-based servo-signal decoder that notices when we flip a
switch on the transmitter, and sends out a digital pulse that
electronically triggers the start/stop button.
This shutter trigger just uses a pic10f220 ($0.65 each), a resistor, a bit of wire,
and one end of a servo cable extender, which plugs into the receiver's GEAR connection.
This connection supplies the servo signal to decode, and power to the camera.
Download the pic code for this project as:
[asm] or [hex].
|
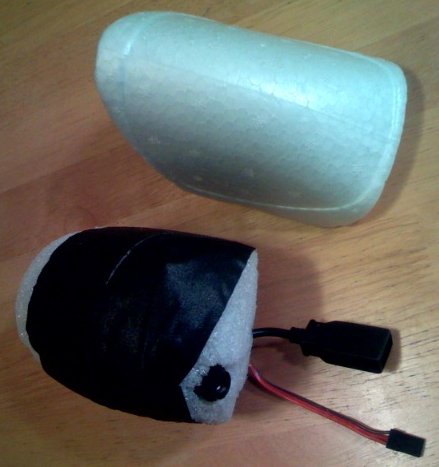
To mount the camera onto the plane, I carved a new canopy (cockpit-shaped foam chunk)
out of a large foam egg from an art-supply store, and then cut a slit for the thin camera
board, so that the lens pointed forward, and slightly down. After lining everything up,
I hot-glued it all back together, and taped around it for a smoother finish.
I then added two grooves on the top of this new canopy for rubber bands to hold it on,
and bam, we had ourselves a camera-plane!
This photo compares the original canopy to our camera-canopy.
|
 |
Watch the videos
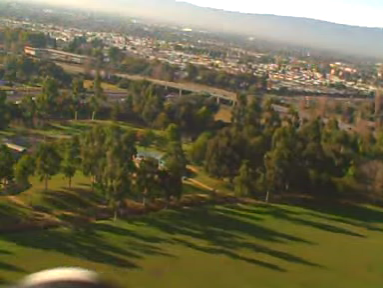 |
Our first flights with the camera have been great! Check out the videos here (higher quality, but requires XviD codec), or on google video (lower quality, but better for streaming).
|